Jan 20, 2009

Simple Funky Earrings

So you don't have any earrings to go with that dazzling muumuu with the colorful sea creatures and the bright, shimmering rainbow. No...those pearl earrings just won't do and that other one is kinda booorrring! Hey- no be shy...make your own earring and show off your distinctive
personality.

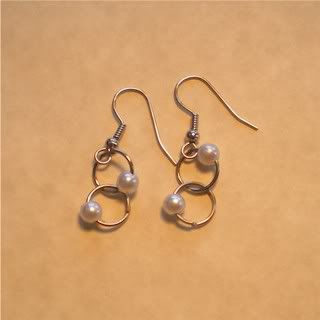
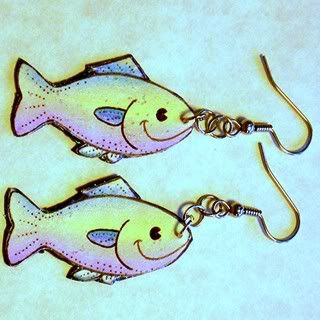
You can make earrings quite easily with inexpensive supplies purchased from your neighborhood craft store or recycled items from your home. Charms from broken necklaces can be attached to a jump ring and connected to an earring hoop or wire or just string up some beads to your earring wire. If you want something a little more eccentric, try working with stickers or paper cut- outs to create your own funky design like the fish earrings above. Instructions are as follows.

Materials:

decorative paper
sticker or cut-out image of your choice
craft glue
clear finger nail polish or sealer like Mod Podge
small paint brush (if you're using Mod Podge)
needle nose pliers
jump rings
earring wires
sharp scissors
needle

Directions:

1. Select your sticker or image that you want to make into earrings. In this case, a heart.
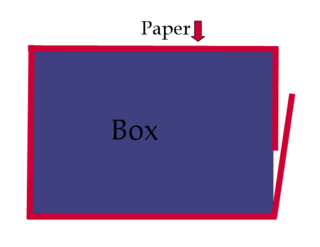
2. Apply a thin layer of craft glue to the cut-out or adhere the sticker to the back side of a piece of decorative paper that is slighter larger than the image.
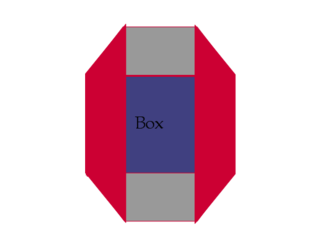
3. If I am using a paper cut-out that is not already coated with varnish or sealer, I like to first seal to the image with nail polish. Let dry for about 10 minutes, then turn the image over and cover the decorative paper with sealer. Let dry about 10 minutes. Usually stickers are coated with a water resistant finish so I just seal the decorative paper with finger nail polish and not the sticker.

4. When your sealer is dry, carefully cut around the decorative paper with your sharp scissors getting as close to the edge of your image as you can.
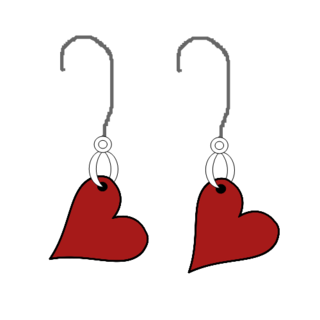
5. Next, you will need to poke a hole in the image where you want to insert the jump ring. Open up the jump ring with your needle nose plier, hook it through the hole and onto the earring wire. Close jump ring.
6. If necessary, touch up your heart earrings with sealer, let dry before wearing.
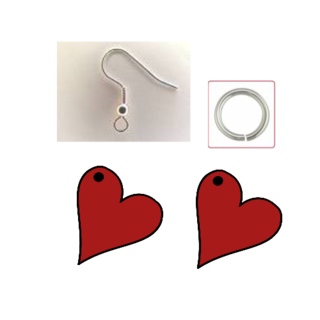
If making jewelry for keiki, make sure you use lead free products such as sterling silver or gold.

Other easy earrings to make:

___________________________________________


Jan 14, 2009

DIY Gift Bags

These are instructions on how to make your own gift bags that can hold bulkier items. Using a box as your template and recycled or pretty scrapbook paper, you can make an assortment of gift bags in many sizes. It's a little easier to make than the flat gift bags, posted earlier, because it's just like wrapping a present. My mini gift bags were made by using a soap box and a cassette tape case as templates.

Materials:
box template
paper
scissors
glue

Directions:

1. Wrap your paper around the box extending the paper over the bottom for folding. It's best if you start and end wrapping your paper on the narrow side of the box and glue down the overlapping edge.

2. Just like you would do when wrapping a present, fold the sides in.

3. Now fold the top and bottom down and glue to secure.

4. Now slip your box out of the unsealed side and you have gift bag that is ready to use. Once your bag has been filled with goodies, fold the top over and seat with a sticker or punch a hole, thread ribbon through the hole and tie a bow.

Hope I explained it clearly enough...if not, just imagine wrapping a box and folding only one side closed rather than both ends.

A project by Keiki Gift Ideas
http://keikigifts.etsy.com

________________________________________________

On sale at Keiki Gifts, Etsy
Thoughts of You Gift Bags, (set of 12)
$3.00 plus shipping

Jan 7, 2009

Hawaii Carnival #1

Welcome to the January 7, 2009 edition of a Hawaii Carnival. What a great way to celebrate the New Year by observing all that is beautiful and special in Hawaii. We have great posts from our readers. Enjoy!

Sarah Burns presents Ohana Mama: Aloha! (about me) posted at Ohana Mama, saying, "Ohana Mama is place where our main focus is to feature mom entrepreneurs and their goods. We host giveaways, feature interviews and do reviews of everything for your Ohana. Share, Learn, Grow!" Please visit Ohana Mama's blog for some great articles, tips and giveaways.


GrrlScientist presents When is a Honeyeater not a Honeyeater? The Tricks of Convergent Evolution posted at Living the Scientific Life, saying, "Every once in awhile, I will read a scientific paper that astonishes and delights me so much that I can hardly wait to tell you all about it. Such is the situation with a newly published paper about the Hawai'ian Honeyeaters. In short, due to the remarkable power of convergent evolution, Hawai'ian Honeyeaters have thoroughly deceived taxonomists and ornithologists as to their true origin and identity for more than 200 years." GrrlScientist also has some wonderful photos of our islands. GrrlScientist also has some brilliant scenic photos of Hawaii.

Nora Dunn presents Driving Around Hawaii | The Professional Hobo posted at The Professional Hobo, saying, "This is a humorous and educational take on a week-long driving trip around the Big Island of Hawaii." and "What we didn't cover in our first trip around the Big Island of Hawaii, we caught up with in this second trip. After the two trips, we pretty much covered the place from top to bottom and everything in between."The Trip Around Hawaii: Take Two | The Professional Hobo.

That concludes the first edition Hawaii Carnival. Submit your blog article to the next edition of A Hawaii Carnival using our carnival submission form.

Past posts and future hosts can be found on our blog carnival index page.

Jan 6, 2009

Craft Carnival #2

I'm presenting my second edition of a crafts carnival with very fun and creative posts from fellow crafters. My first crafts carnival was held here on my Keiki Gifts Blog and I'm continuing my carnival posts on the Hawaii WAHMs blog so I can continue to enjoy and share online crafting discoveries.

Welcome to the January 6, 2009 edition of crafts carnival. I'm sure you'll find pleasure visiting these blogs for more great projects and information.

  • I haven't seen many rice bags made with fabric that can be reused but I remember my elders telling me about clothing made out of rice bags. I'm happy to know that there are fabric rice bags that can be made into handy and useful upcycled products. Condo Blues presents Turn Rice Bags into Shopping Tote Bags read about it at Condo Blues.

That concludes this edition of my Keiki Gifts Crafts Carnival. Submit your blog article to the next edition of crafts carnival using my carnival submission form. Past posts and future hosts can be found on my blog carnival index page.

Thanks for submitting your post and for stopping by!

A Carnival Post by Keiki Gift Ideas
http://keikigifts.etsy.com

Jan 2, 2009

DIY Flat Gift Bags

Happy New Year!

Here is a simple project to do with all the left over wrapping paper you may have salvaged from your opened Christmas gifts, decorative paper you have in your stash or even brown paper bags. You can turn these scraps into pretty gift bags or envelopes that you can use whenever needed.

This projects involve a just a little cutting, pasting and an old greeting card to use as a template. The card will determine the size of your bag. Later on when you get the idea of the sizes you'll need, you can pretty much work without a template and just repeat the procedures.

Materials:

decorative paper or brown grocery bags
glue
scissors
greeting card to use as template

Directions:

1. Place card on one corner of the wrapping paper matching edges. The wrapping paper should be cut a little larger than the card itself leaving one edges to fold up on one side and the bottom.
Step 1

2. Fold the excess side along up along the edge of the card.
Photobucket

3. Fold the bottom up along the edge of the card.
Photobucket

4. Remove card and fold paper in half.
Photobucket

5. Unfold, open bottom fold and cut out orange section as shown using the creases as a guideline.

Photobucket

6. Open side flap and cut out orange corners in a triangular shape.
Photobucket

7. Fold side back down and place glue on flap.
Photobucket

8. Fold in half and place glue on bottom flap.
Photobucket

9. Fold up bottom flap to complete your bag.
Photobucket

I hope you enjoyed this simple project.

A project by Keiki Gift Ideas
http://keikigifts.etsy.com

LinkWithin Related Stories Widget for Blogs